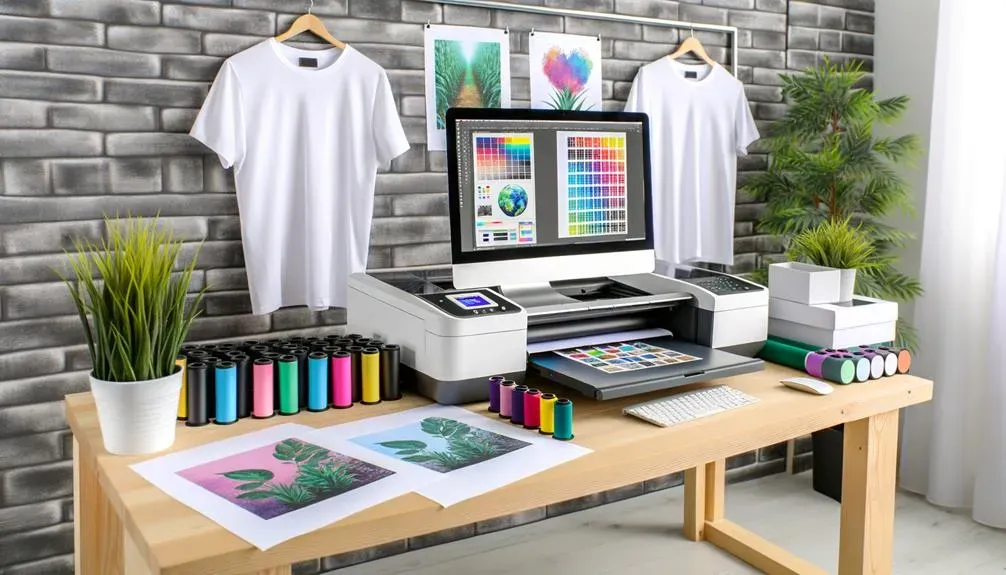
A well-designed home DTF studio setup opens up endless possibilities for small-batch apparel and custom items, delivering vibrant colors, a soft hand-feel, and the flexibility that hobbyists and small businesses crave, all while keeping your workflow organized and scalable as demand grows. Direct-to-film (DTF) printing delivers vivid transfers, and pairing it with a reliable home DTF printer setup can smooth daily production for beginners and indie brands alike, reducing setup time, waste, and reprints when you align profiles and materials from the start. However, turning a corner of your home into a productive workspace requires more than just a good printer, and a solid DTF equipment checklist helps you line up ink, films, powders, and heat equipment, while budgeting for consumables and labeling everything to prevent confusion during busy runs. The success of such a project hinges on three pillars—designated space, the right equipment, and robust safety practices guided by DTF safety guidelines, along with practical storage solutions and a simple, repeatable maintenance routine. This introductory guide walks you through space planning for a home studio, printer setup, and workflows to ensure smooth DTF transfers while keeping your setup organized and safe, with tips on ventilation, noise control, and everyday troubleshooting to keep beginners confident.
Home DTF Studio Setup: Space Planning, Zoning, and Workflow Optimization
Creating a functional home DTF studio setup starts with deliberate space planning that separates work from daily life. Define zones for printing, curing, finishing, and storage to reduce cross-contamination and streamline your workflow. By identifying a dedicated corner or room with good ventilation and a solid, level floor, you set the foundation for consistent results and safer operation.
In practice, this means mapping out where your DTF printer sits relative to media storage, where heat pressing happens, and where films, powders, and transfers are prepped. A well-planned layout minimizes travel time, lowers the risk of spills, and supports a smoother production rhythm. Embrace the idea of a scalable space so you can grow from hobby projects to small-batch runs without outgrowing your workspace.
DTF Printer Setup Essentials for Reliable Color and Durable Results
A reliable home DTF printer setup begins with a stable, clean workspace and proper airflow. Position the printer on a sturdy surface with easy access to ink bottles, film, and transfer sheets. Regular calibration—especially color and alignment—ensures your white underprint and color layers print with the expected brightness and hue across different fabrics.
Establish a baseline color profile and test prints before starting major jobs. Manage film and powder workflow by keeping handling areas clean and powders stored in sealed containers away from heat sources. Plan post-print steps, such as heat fixation or curing, so they stay separate from garment finishing to prevent contamination and ensure durable transfers.
DTF Equipment Checklist: Building Your At-Home Production Toolkit
A practical DTF equipment checklist forms the backbone of a dependable home studio. Core items include a DTF printer with compatible white and color inks, a transfer press, a curing device or conveyor, and a sturdy work table with labeled storage for films, powders, and transfers.
Beyond the basics, stock PPE, safety gear, ventilation options, and maintenance supplies. Keep cleaning kits, calibration tools, labeling equipment, and spare parts on hand. A well-organized toolkit supports consistent production, reduces downtime, and makes it easier to scale up as demand grows.
DTF Safety Guidelines for Home Workshops
DTF safety guidelines should be embedded in daily practice. Prioritize ventilation to manage solvent fumes and particulates, using an exhaust system or high-quality air purifier as needed. Wear appropriate PPE when handling powders and inks to protect eyes, skin, and lungs.
Electrical safety and chemical storage are critical. Use GFCI outlets, keep cords organized, and store chemicals in clearly labeled, sealed containers. Develop disposal procedures in accordance with local regulations and train anyone sharing the space on emergency procedures and safe operation of heat presses and curing equipment.
Space Planning for a Home Studio: Layouts that Boost Ventilation and Comfort
Effective space planning for a home studio centers on ventilation, surface area, and logical workflows. Choose a room or corner with good airflow and a solid floor, and arrange zones so printing, curing, and finishing have dedicated space. This thoughtful layout reduces heat buildup and minimizes odors, creating a healthier and more productive environment.
Ergonomics matter just as much as ventilation. Invest in a comfortable chair, an anti-fatigue mat, and an adjustable-height worktable to support long sessions. If you share living spaces, consider sound-damping options to keep noise levels reasonable while maintaining a productive atmosphere.
From Pre-Press to Transfers: Achieving Consistent DTF Transfers and Quality Control
A repeatable workflow starts before pressing: pre-press garments to remove wrinkles, prep fabrics, and plan jobs by color profile and substrate. The powder application and curing steps should follow a defined sequence to ensure film adhesion and durability of the transfer.
Quality control is the final safeguard. Document temperature, time, and pressure settings, and run color checks with test garments or swatches. Regularly inspect transfers for color accuracy, edge quality, and durability, and maintain up-to-date color management routines so future jobs replicate the same high standards.
Frequently Asked Questions
How do I start a practical home DTF studio setup?
Define your printing scope and daily volume, then choose a dedicated, well-ventilated space. Plan separate zones for printing, curing, finishing, and storage, and select core gear such as a DTF printer with inks, a reliable heat press, and curing equipment. Implement basic safety practices and design the layout with future growth in mind to support a steady workflow.
What items are essential on a DTF equipment checklist for a home DTF studio setup?
DTF printer and compatible inks; heat press or transfer press; curing equipment; sturdy work table and labeled storage; film, powders, and transfer sheets; PPE and safety gear; ventilation and air quality tools; cleaning and maintenance supplies; calibration and testing tools; plus miscellaneous items like Teflon sheets and clamps. This DTF equipment checklist helps ensure you can complete jobs reliably.
How should I apply space planning for a home studio to optimize DTF transfers?
Create dedicated zones for printing, curing, finishing, and storage in a space with good ventilation and a level floor. Arrange the printer near power and media storage, use flooring and cable management to reduce trips, and maintain clear safety distances around the heat press. Proper space planning for a home studio minimizes mistakes and improves transfer quality.
What are the key DTF safety guidelines for a home DTF studio setup?
Ensure adequate ventilation or air purification to handle fumes and powders. Use PPE such as gloves and eye protection, keep powders in sealed containers, and store chemicals per manufacturer instructions. Use GFCI outlets, manage cords to prevent trips, have a fire extinguisher on hand, and follow proper disposal practices for inks, solvents, and waste.
What is the typical workflow in a home DTF studio setup for printer setup and transfers?
Set up in a clean, level workspace and place the printer in its printing zone. Install media and inks according to manufacturer guidelines, then calibrate color and alignment. Manage film and powder with a clean workflow, plan post-print steps for curing or fixation, and finally align and transfer the design to garments with controlled pressure and temperature. Document color profiles and testing results for consistency in DTF transfers.
How can I maintain and prolong the life of my home DTF studio setup equipment?
Establish a maintenance schedule: daily surface cleaning and cord checks, weekly printer feed and alignment checks, monthly ventilation and part inspections, and seasonal deep-cleaning of curing areas. Calibrate colors regularly, replace worn silicone mats or seals as needed, and store consumables properly. Regular upkeep protects print quality and equipment longevity in a home DTF studio setup.
| Key Point | Summary |
|---|---|
| Introduction | Overview of building a functional home DTF studio and the three pillars: the right equipment, a well-planned space, and robust safety practices, to support consistent results and smooth workflow. |
| Defining the Home DTF Studio Setup | Define scope (what you plan to print, daily volume, tolerance for noise, heat, and odors); plan for growth; create a dedicated zone separate from daily life. |
| Space Planning for a Home Studio | Choose a ventilated, level space and address ventilation, power/outlets, layout zones, safety clearances, and comfort. |
| Essential Equipment for a DTF Home Studio | Core items: DTF printer and inks, heat press, curing equipment, work table/storage, film and transfer supplies, PPE, ventilation tools, cleaning and calibration gear, and miscellaneous accessories. |
| DTF Printer Setup and Workflow | Place printer in a logical zone, install media/inks, calibrate color/alignment, manage film and powder workflow, and plan post-print steps. |
| DTF Safety Guidelines for Home Use | Ventilation and air quality, handling inks/powders, fire and electrical safety, chemical storage and labeling, PPE, and proper cleaning/disposal. |
| A Step-by-Step Setup Plan | Seven steps: define space/zones; install safety infrastructure; assemble core equipment; organize supplies; establish workflows; calibrate and test; perform safety maintenance. |
| Maintenance, Cleanliness, and Longevity | Regular routines: daily, weekly, monthly, and seasonal tasks to keep surfaces clean and equipment in good condition. |
| Workflow Efficiency and Quality Control | Process steps for efficiency: pre-press, print planning, powder application, curing, transfer finishing, and ongoing quality checks. |
| Common Mistakes and How to Avoid Them | Ventilation, cable management, inconsistent heat/pressure, skipping cleaning, and underestimating storage; apply fixes like proper ventilation, organized cables, calibration, routine cleaning, and prepared stock. |
Summary
home DTF studio setup transforms how you bring custom designs to life from your own space, combining practical gear, thoughtful layout, and safety into a smooth, repeatable process. When you prioritize the right equipment, a well-planned workspace, and robust safety practices, you’ll enjoy consistent transfers, reduced downtime, and a calmer working environment. By following a structured plan—from space zoning and equipment selection to ongoing maintenance and quality control—you can scale small-batch production while keeping your home comfortable and safe.

