DTF Printing Essentials has transformed how brands print on fabric, offering flexibility, cost efficiency, and vibrant designs for a growing market worldwide. This guide covers the Direct-to-Film printing workflow and how to optimize color management for reliable results across multiple fabrics in a production environment. From selecting a DTF printer setup and appropriate ink choices to choosing the right transfer film, every decision affects durability and color accuracy. In practice, you’ll calibrate profiles, monitor substrate compatibility, and refine the powder, cure, and transfer sequence for consistent results across different runs. With patience, experimentation, and a solid workflow, DTF Printing Essentials empowers you to scale production while maintaining vibrant, durable finishes on textiles.
From another angle, this process is often described as a film-to-fabric transfer or a digital garment transfer that starts with printing on a specialized carrier and ends with heat pressing onto textiles. In practice, it combines digital design clarity with practical finishing, using a protective coating or powder after printing to secure the image before the final press. Compared with vinyl or traditional screen printing, this approach offers vibrant color, a softer hand on most fabrics, and easier color separation for multi-color graphics. In LS I terms, you’ll hear phrases like transfer-on-film, textile film printing, or garment decoration via a printable carrier, but the workflow—design, print, apply, cure, and press—remains consistent.
Direct-to-Film Printing Workflow: From Design to Transfer
Direct-to-Film printing is a workflow that starts with strong artwork and ends with a fabric-ready transfer. In this process, designers prepare artwork with color management, considering whether to separate colors for a screen-print-like result or to work with CMYK profiles designed for transfer films. The image is printed onto the DTF transfer film using a dedicated DTF ink system, setting the stage for vivid, multi-color designs.
Once the design is printed, a powder adhesive is spread over the wet ink, then cured. The powder bonds to the image, and the transfer to fabric is accomplished with heat and pressure. Mastering this sequence—the film print, powder application, cure, and final transfer—helps you optimize each step for durability and color fidelity.
To ensure repeatable results, you’ll want to align your DTF printer setup with your workflow, including calibration, ICC profiles, and consistent heat and timing. This integration reduces guesswork and supports scalable production.
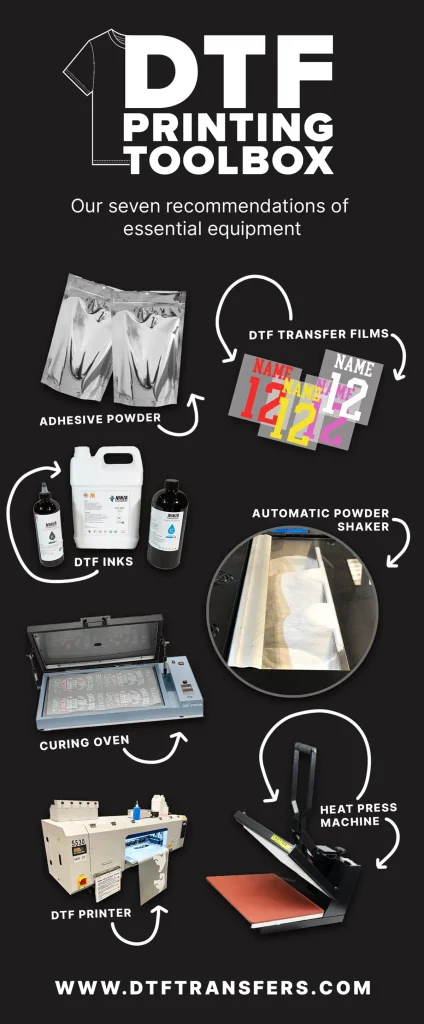
DTF Supplies: The Essential Toolkit for Consistent Results
A reliable DTF operation hinges on quality supplies. Core items include DTF transfers film for the carrier, DTF inks formulated for film printing, a dependable powder adhesive for bonding, and an optional protective topcoat to seal the transfer and enhance wash durability.
Also essential are PET transfer film or compatible release liners, a clean printer setup and maintenance tools, a heat press with even platen and precise temperature control, and confirmation that your DTF inks are compatible with your printer model. Getting these pieces right reduces misprints, color drift, and downtime.
The exact mix is driven by production volume and substrate choices; start with a solid core kit and expand as you validate your process against typical garments and fabrics.
DTF Printing Essentials: A Practical Comparison and Implementation
Direct-to-Film printing offers distinct advantages over traditional vinyl and DTG. It enables intricate multi-color designs with a softer hand on many fabrics and can simplify on-demand and mid-volume production.
When choosing methods for your shop, weigh factors like color vibrancy, wash durability, substrate compatibility, and cost per unit. The content here equips you to apply DTF supplies, transfer film quality, and ink performance within your business goals.
This comparison helps you plan how to integrate Direct-to-Film printing into your workflow, selecting compatible materials, and validating lift, transfer, and wash performance across your typical garment types.
DTF Printer Setup: Achieving Consistency from Ink to Fabric
A dependable setup begins with selecting a compatible DTF ink system and ensuring the film matches your printer. Regular calibration, color profiles, and stable environmental conditions help minimize shifts in color and density.
Practical steps include installing the DTF inks, using a dedicated transfer-film profile, performing nozzle checks, head cleanings, and running test prints to verify color accuracy before production.
Keep the film and powder lines clean and dust-free to avoid defects on the final transfer and maintain consistent results across runs.
The Powder, Cure, and Transfer Process: Bonding for Durability
After printing the design on the film, the bonding powder adheres to the wet ink, and a curing step fuses the powder to the image. This prepares the film for the final transfer to fabric using heat and pressure.
Managing timing is critical: under-curing may cause poor adhesion, while over-curing can affect image clarity. Run tests with fabrics similar to your production garments to dial in powder quantity and curing time.
During transfer, ensure the transfer film sits flat on the garment and that heat and pressure are evenly applied to maximize durability.
Artwork and File Prep for DTF: Design Smarter with Color Management
Even though DTF handles many styles, designing with transfer in mind improves color accuracy and edge detail. Use vector graphics for logos and text, or high-resolution raster images (at least 300 dpi) at the target print size.
Choose color palettes that translate well in CMYK and understand how DTF inks reproduce color on dark versus light fabrics. Include a white underbase when necessary to retain brightness on dark garments.
Plan artwork for the DTF workflow by testing on similar fabrics and preparing files with the appropriate bleed and trim margins, ensuring your designs align with your transfer film and ink capabilities.
Frequently Asked Questions
What is DTF Printing Essentials, and why is it important for my shop?
DTF Printing Essentials refers to the core workflow, equipment, and consumables used in Direct-to-Film printing. It highlights essential DTF supplies, the DTF transfer film, the printer setup, and DTF inks to achieve vibrant, durable transfers. Understanding it helps you optimize production, reduce waste, and scale your operations.
What are the essential DTF supplies I need to start with Direct-to-Film printing?
For a solid DTF Printing Essentials setup, you’ll need DTF transfer film, DTF inks, a reliable powder adhesive, an optional topcoat, PET transfer film or release liners, a well-maintained printer setup, and a quality heat press. Start with a core kit and expand as you refine your workflow.
How should I set up my DTF printer for consistent results in DTF Printing Essentials?
A consistent DTF printer setup relies on compatible DTF inks and transfer film, ICC color profiles tailored for Direct-to-Film printing, proper print head maintenance, and controlled humidity and temperature. Regular nozzle checks and clean film paths help prevent color shifts and ensure repeatable results.
How does Direct-to-Film printing compare to DTG or vinyl in the context of DTF Printing Essentials?
Direct-to-Film printing typically offers vibrant, multi-color designs with a softer hand on fabrics and broader substrate compatibility than vinyl. Compared to DTG, DTF can be more forgiving on dark garments and often requires less pre-treatment. Each method has trade-offs in cost, durability, and workflow efficiency.
What are common issues in DTF Printing Essentials and how can I troubleshoot them?
Common issues include color mismatch or banding, poor adhesion, white halos, and cracking after wash. Troubleshoot by verifying ink density and ICC profiles, checking powder coverage and curing time, ensuring proper transfer film handling, and confirming the printer setup and fabric compatibility.
How can I design and prepare artwork for DTF Printing Essentials on dark fabrics?
Design for DTF Printing Essentials by using vector graphics for clean edges, preparing high-resolution raster files (at least 300 dpi), and planning a white underbase when printing on dark garments. Use CMYK-optimized color palettes compatible with DTF inks and test on similar fabrics with the transfer film to ensure accurate color reproduction.
| Aspect | Key Points |
|---|---|
| What is DTF Printing Essentials? | – Direct-to-Film transfer-based printing workflow – Print on transfer film, apply powder adhesive, cure, then transfer with heat/pressure – Differs from DTG: ink sits on film first; can improve color vibrancy and fabric handling – Scalable and versatile for on-demand/mid-volume production |
| Main Workflow | Design artwork with color management and suitability for film Print on transfer film Apply bonding powder Cure the powder Transfer to fabric with heat/pressure |
| Essential DTF Supplies | – DTF transfer films – DTF inks – Powder adhesive – Topcoat (optional) – PET transfer film / release liner – Cleaning and maintenance tools – Heat press with even platen – Compatible ink system for your printer |
| DTF vs Other Methods | – Compared to vinyl: supports multi-color designs with a softer hand – Compared to DTG: often better on dark fabrics and wider fabric compatibility; fewer pre-treatments in some cases – Trade-offs: cost per unit, wash durability, color vibrancy varies by substrate and process |
| Printer Setup & Calibration | – Use an ink system profile designed for DTF inks – Calibrate with ICC/color management profiles for transfer film – Regular nozzle checks and head cleaning – Maintain film and powder paths clean – Ensure proper humidity/temperature in workspace |
| Powder, Cure & Transfer Process | – Powder adheres to wet ink; proper coverage is key – Short curing step fuses powder to the design – Transfer to fabric with heat/pressure; timing is critical – Test powder/ink ratios and curing on sample garments |
| Artwork & File Prep | – Prefer vector for logos and clean edges; high-resolution raster (≥300 dpi) for details – Plan CMYK translations for DTF inks – Use white underbase on dark fabrics when needed – Anticipate edge handling and color shifts across fabrics |
| Applications & Best Practices | – Suitable for t-shirts, hoodies, bags, patches, etc. – Pre-test on similar fabrics; use appropriate pre-treatments as needed – Maintain consistent heat press settings; follow substrate and ink guidelines – Document successful settings for repeatability |
| Troubleshooting | – Color mismatch/banding: check ink density, ICC profiles, and film quality – Poor adhesion: verify powder application and curing parameters – White halos/edges: ensure powder coverage and flat transfer – Cracking/peeling: confirm curing and fabric compatibility |
| Maintenance & Long-Term Considerations | – Regularly clean print heads and film paths – Inspect transfer film stock for moisture/damage – Rotate powders/films to prevent clumping – Update profiles/workflows with new supplies and equipment |

